There are a few things to consider in order to get the most out of your Calculator and make it highly effective:
- Configuration – make sure you have setup the calculator with all the features you need to deliver the best experience.
- Installation – where you install it on your website
- Promotion – how you encourage parents to use the calculator
Let’s take a look at each of these…
Configuration & Settings
As part of the onboarding process you will test your fee calculator configuration and set it up just how you want it. However, there are potentially some other configuration settings which you may wish to take advantage of now or in the future. Here is a quick run down on the main setup options and features:
Payment Information display
The Payment Information feature allows schools to display key payment information directly within the Fee Calculator. This information, presented at the exact time families are thinking about fees and how to afford or pay for these fees, is vital to assist parents in their decision making process as they consider the education options for their children.
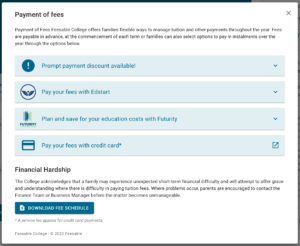
This information is displayed on the Fee Estimate Results page, with a new ‘PAYMENT INFORMATION’ button which opens a modal to display the information.
Read the support article to learn more about this feature.
Custom frequency display
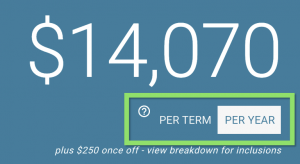
The results screen shows different frequency options – Per Term and Per Year are the defaults. You can however add more frequency options such as Per Week or Per Month. In fact you can have any custom frequency you wish! We recommend the default two options and a maximum of three.
Custom contact form setup

The contact form can be customised to suit the needs of your school with different setting such as:
- Set fields as required or not required.
- add or remove certain fields
- remove the contact form entirely (ideal use case for this is when the calculator is embedded in a secure parent portal – read below in the installation section)
Custom email text
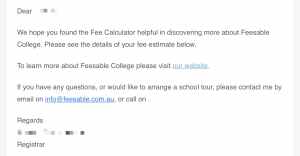
You can customise the copy of the email sent to parents with the fee estimate – add important links, contact details or other key enrolment information to help the parent know what the next steps are.
Custom ‘call to action’ links

On the results page there are several call to action (CTA) links to help parents find out more information or take the next step – you can change these links as needed, and also add or remove these CTA options. The default is 3 CTA’s, but you can have 1 or 5… it’s up to you.
Customise the fee breakdown
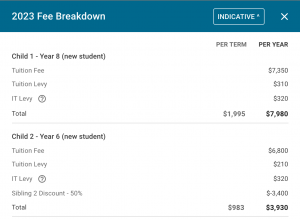
The Breakdown is an important view for parents to understand the finer details of your fees. There are number of ways to setup how your fees are displayed in the breakdown – this will depend on how your fees are structured, and also on your preferences. There are many different configurations such as:
- Line item grouping – you can choose to have fees grouped together or to show as separate items
- Add fees or levies Per Student, Per Family or Per Year
- Once off or recurring fees
Add Custom notes
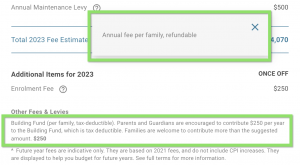
You can add notes as separate line items or as tips related to fee line items. These notes can be very useful to help parents understand clearly where their money is going.
You can also use notes to include crucial information from your fee schedule.
Add Custom notes
You can add notes as separate line items or as tips related to fee line items. These notes can be very useful to help parents understand clearly where their money is going.
You can also use notes to include crucial information from your fee schedule.
Custom Email settings
You can set a default ‘reply-to’ email so all replies to the fee estimate email comes directly to the right person (such as [email protected])
You can setup the Fee Calculator to send fee estimates to the parent from a custom email address such as [email protected]. The default is set to send from [email protected].
This will deliver a consistent branding experience and reinforce trust. Plus it will allow parents to reply directly to the email to get in touch with the school.
Multi campus features
If you have multiple schools or campuses, you can use a single calculator and place a campus selector option on the form – the fees will change based on the campus selected.
This can also be used for ELC or Prep if fees are significantly different.
Integrations
If you are a Digistorm Funnel customer, then take advantage of the integration to send your fee enquiries direclty into Funnel. Learn more about the Funnel integration.
There will be more integrations to come in the future, and if you wish to see any other integrations, please get in touch at [email protected].
These settings can be updated and changed at any time, so please get in touch if you wish to make changes to your setup.
Installation
Where you install your fee calculator on your website is important and will have a big impact on how effective the fee calculator is for your school. Here are a few suggestions.
Create a dedicated school fees page
Depending how your fee information is currently displayed, you may need to make some changes to your website architecture. If you don’t already have one, we recommend setting up a dedicated ‘School Fees’ page on your website such as www.yourschool.edu.au/fees or www.yourschool.edu.au/enrolment/fees.
This will make it very easy for parents to find the fee information, and allow you to link to this page from other places. From our experience, you will find that this fees page becomes one of the most visited pages on the website, and also ranks very well in Google search listings, which indicates how much people search for fees.
Multiple installations
You can install the Fee Calculator in multiple locations at once, which can be useful to make sure that parents can find it easily. Some schools install on the dedicated fees page, plus also add it to another key enrolment page, or even campaign landing pages.
Another tip is to install your fee calculator inside your secure Parent Portal to allow the current community to use it as a tool for budgeting – in this example you would create a streamlined version of the calculator with no contact form so parents can bypass the form and quickly view fee estimates – get in touch with us to discuss how to set this up.
Installation Method
The fee calculator can be installed on your website in a few different ways – simple script embed, iframe and via a WordPress plugin. We recommend using the default script embed as that will deliver the best experience for users, but make sure you check with your web team to work out the best option for your school. Plus, review the support article for more information on installation methods.
Promotion
Promotion is possibly the most important to get right. Once you have your configuration right and the Calculator is installed where you want it, it is vital to make sure you do a good job on making people aware it exists and encouraging people to use it. Here’s a few tips to help you get the most exposure for your Fee Calculator:
- Make the Fee Calculator one of the main calls to action across your website
- Add the Fee Calculator as a call to action (button/link) on the home page
- Add a link to the Fee Calculator in the main menu
- Add links to the Fee Calculator from other key pages on the website such as Enrolment or About as next steps
- Add the Fee Calculator to campaign landing page as a practical next step for visitors rather than a standard contact form – parents receive vital information and the school will still receive the enquiry.
- Use the Fee Calculator in enrolment conversations (over the phone or email) – send them a link to use it, and even run a live fee estimate over the phone and send the fees to them right there and then
- Add a link to the Fee Calculator in enrolment or promotional emails as a next step for parents
- Add a link or QR code link to the Fee Calculator on your school prospectus, brochures or advertising
- When you update fees or make changes, send the current families a link to the Fee Calculator to view their new fees and help with budgeting (ideally within the secure portal with the streamlined calculator version)
Every school has different promotion and marketing strategies, so use what ever suggestions above suit your strategy, but in any case, we encourage you to be intentional about how you use promote the Fee Calculator and we guarantee it will be a highly effective tool for parents and generate valuable enquiries for your school.
We also recommend reading our article on best practices for the fees page on your school website.
If you need any further support to help setup or make the most of your Feesable Fee Calculator, please get in touch with us – [email protected].